Using await to build cool UI tutorials
In the last post we discussed how we can build custom awaiters and showed simple example how to await for click on the Button instance.
Maybe it was not obvious how we can expand that idea and create some useful application, so i decided to expand the whole concept in this post.
We are going to build some more complex awaiters (for example TextBox awaiter that awaits for certain text to by typed into it) and use it together with the old Button click-awaiter to build the tutorial on how to use some imaginary app inside of the app itself.
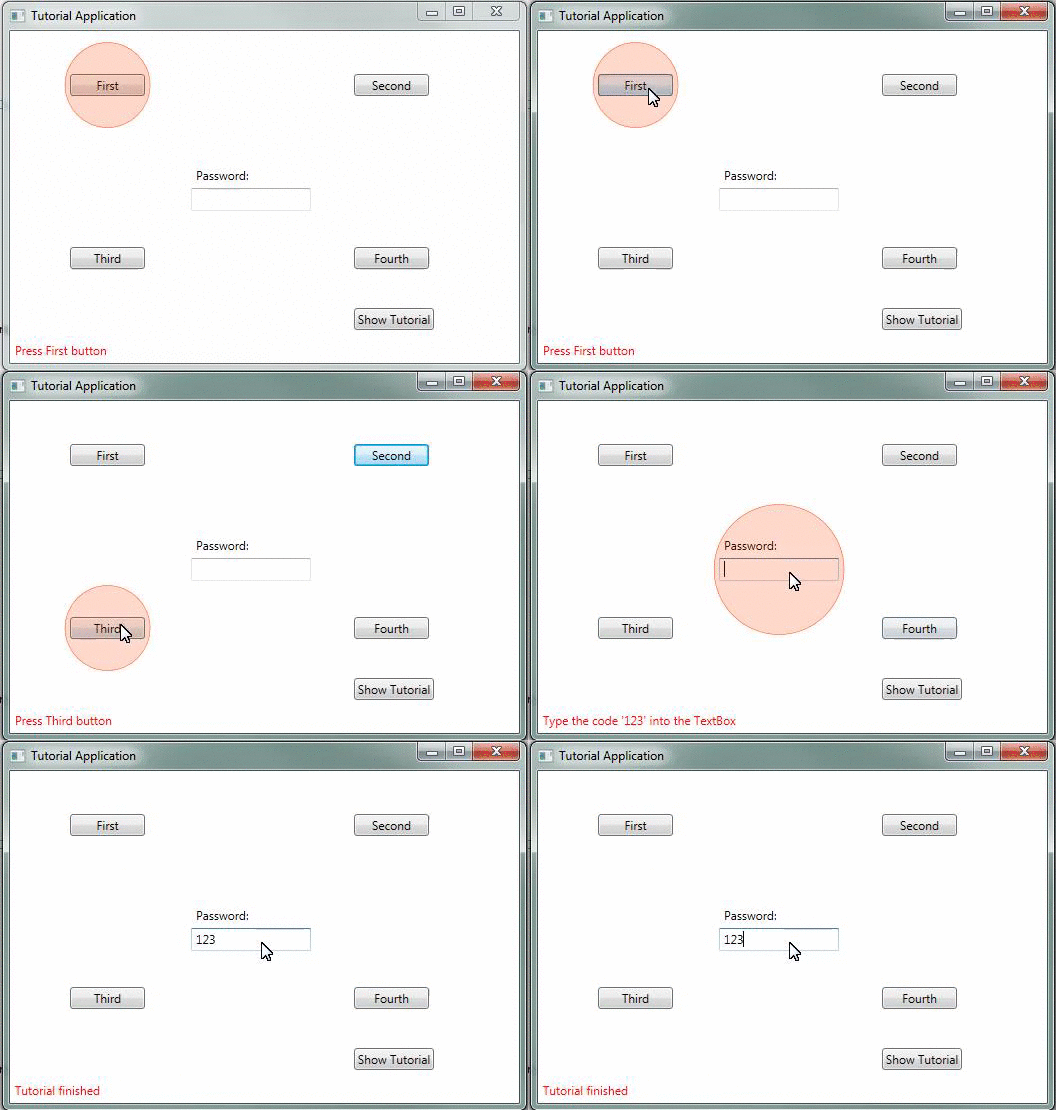
For those not patient enough here is what it will look like at the end:
So lets get started. First we need to build that awaiter for text box to be typed into the TextBox. This is little more complicated then our Button awaiter because in this case we need to pass the text parameter to our awaiter, and await keyword does not support that out of the box.
This is the usage we want to achieve in the end – if we are awaiting for text “123” to be entered into TextBox named tb1 then we want to be able to write something like this in our code:
await new TextBoxTextAwaiter(tb1, "123");
To do the trick, first we are going to create one intermediary class TextBoxTextAwaiter that will accept two parameters, our TextBox instance and the text that we are expecting to be typed into it:
    public class TextBoxTextAwaiter
    {
        public TextBox TextBox { get; set; }
        public string TextToAwait { get; set; }

        public TextBoxTextAwaiter(TextBox textBox, string textToAwait)
        {
            TextBox = textBox;
            TextToAwait = textToAwait;
        }
    }
So now that we have something to hold on to our parameters we will create an extension method GetAwaiter for that class TextBoxTextAwaiter so that it can be awaited:
    public static class TextBoxAwaiterExtensions
    {
        public static TextBoxAwaiter GetAwaiter(this TextBoxTextAwaiter textBoxTextAwaiter)
        {
            return new TextBoxAwaiter(textBoxTextAwaiter.TextBox, textBoxTextAwaiter.TextToAwait);
        }
    }
As you see in the GetAwaiter we are creating instance of another class called TextBoxAwaiter (details of it below) and pass all the parameters into its constructor and this class can now do the actual await for use:
    public class TextBoxAwaiter : INotifyCompletion
    {
        private readonly string _textToAwait;

        public TextBoxAwaiter(TextBox textBoxToAwait, string textToAwait)
        {
            _textToAwait = textToAwait;
            TextBoxToAwait = textBoxToAwait;
        }

        public void GetResult() {}

        public bool IsCompleted
        {
            get { return TextBoxToAwait.Text.Equals(_textToAwait); }
        }

        public TextBox TextBoxToAwait { get; set; }
        public void OnCompleted(Action continuation)
        {
            TextChangedEventHandler h = null;
            h = (sender, args) =>
            {
                TextBoxToAwait.Focus();
                if (IsCompleted)
                {
                    TextBoxToAwait.TextChanged -= h;
                    continuation();
                }
            };
            TextBoxToAwait.TextChanged += h;
        }
    }
As you see this final awaiter is simple and works similarly like our ButtonAwaiter with difference that its subscribing to TextChanged event of the TextBox and checks if our desired text is entered. Once the text is entered, we are notifying awaiter that we are done by calling the continuation Action (and unsubscribing from TextChanged event for the cleanup).
And that’s all, now we can build any in-application tutorial that involves typing certain text in TextBoxes and clicking on the Buttons. We could off course go further and build all kinds of awaiters for example MouseMovedAwaiter, MouseMovedToRegionAwaiter, UserInactivityAwaiter etc.
Also on mobile platforms we could easily create SwipeAwaiter, ShakeDeviceAwaiter, DoubleTapAwaiter etc.
This would be out of the scope of this article, i just wanted to share this idea 🙂
So here is how we would implement that imaginary “GUI Tutorial” from the image on the top of the post:
            public MainWindow()
        {
            InitializeComponent();
            Loaded += (a,e) => { Setup(); };
        }

        private async void Setup()
        {
            await BtnTutorial;
            ShowDemo();
        }

        private async void ShowDemo()
        {
            tb1.Text = "";
            AddVisualCue(Btn1);
            ShowMsg("Press First button");
            await Btn1;
            ClearVisualCues(Btn1);

            AddVisualCue(Btn2);
            ShowMsg("Press Second button");
            await Btn2;
            ClearVisualCues(Btn2);

            AddVisualCue(Btn3);
            ShowMsg("Press Third button");
            await Btn3;
            ClearVisualCues(Btn3);

            AddVisualCue(Btn4);
            ShowMsg("Press Fourth button");
            await Btn4;
            ClearVisualCues(Btn4);

            AddVisualCue(tb1);
            ShowMsg("Type the code '123' into the TextBox");
            await new TextBoxTextAwaiter(tb1, "123");
            ClearVisualCues(tb1);

            ShowMsg("Tutorial finished");

            Setup();
        }
I’m not posting the whole source code here because you can download the full zipped solution to see all the details. We simply use our awaiters to avoid boilerplate code for anticipated user interactions and we can concentrate on the actual logic of the tutorial.
Off course this is very simplified example but its very easy to extend it and make it really useful and interesting.
I can imagine this approach being used to create in-app tutorials for mobile applications where user would be expected to touch certain parts of the screen, do swipe actions, then maybe shake the device to clear screen etc.
Or for mobile games for kids where they should “interact” with the device in order to proceed in the game, take a picture of their pet, say some voice commands etc.
i would hear about see some nice usages of this pattern, feel free to post some in the comments.

I like it.